how to delete trustedinstaller windows 10
Did you know that a lot of files in Windows are not owned by you, even if you are the Administrator? They are instead owned by an entity called the "Trusted Installer". Such a wonderful sounding name eh!
So that's not a problem most of the time, unless you need to delete certain system files and folders. You'll end up getting a message like:
You do not have permission to perform this action.
or something like:
You need authorization from TrustedInstaller in order to perform this action.
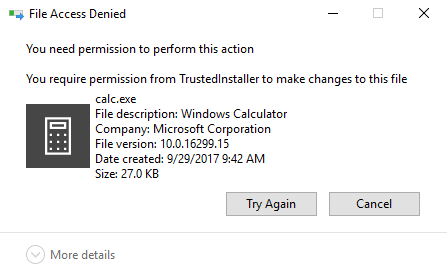
Thanks Windows! So in order to delete a file or folder that is owned by TrustedInstaller, you have to first take ownership of the files or folders and then grant yourself full control permissions and rights!
You have to do all of that just to be able to rename, delete, or edit these files and folders. In this article, I'll walk you through the steps in order to do this. Note that you really shouldn't use this method to try and delete basic Windows features like Windows Defender or IE. It won't work and it'll mess up your computer. Only use this trick for deleting malware or virus files that may have inserted themselves into protected Windows directories.
Take Ownership of Files
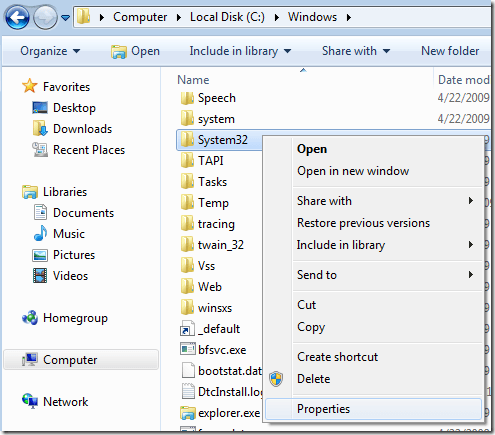
First, go to the folder or set of files that you need to change permissions for, right-click on them and choose Properties.
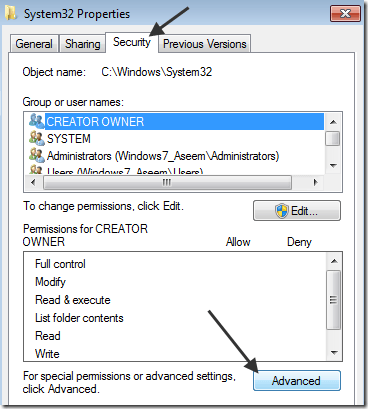
Next click on the Security tab and then click on the Advanced button at the bottom:
Next click on the Owner tab and you'll now see that the current owner is TrustedInstaller.
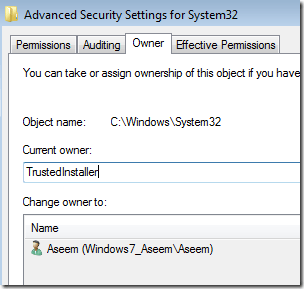
Now click on the Edit (in Windows 10, it's the Change button) button and choose who you would like to change the owner to, either your account or the Administrators group. If your account is an Administrator account, I would suggest just picking Administrators.
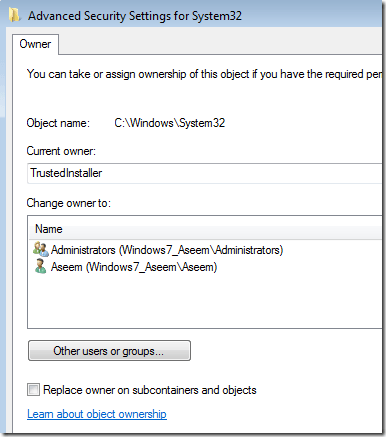
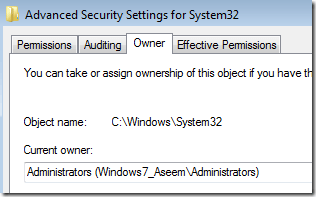
You can also check off Replace owner on subcontainers and objects if you need to delete more than one file in a folder. Go ahead and click OK. Now you will see that the Current owner is the account you picked.
Note that if you are trying to delete an entire folder that has sub-folders, etc., you'll also need to click on the Permissions tab, then Change Permissions, select Administrators or the account you want to use, and then check the Replace all child object permissions with inheritable permissions from this object.
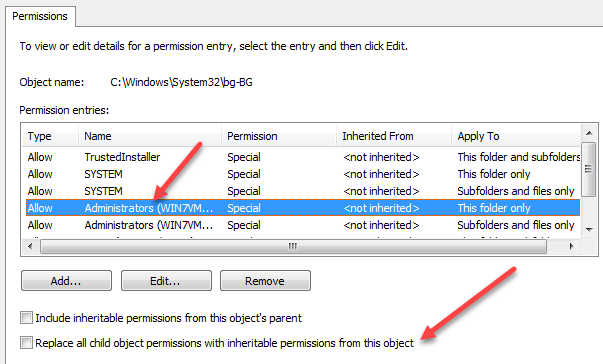
It's worth noting that you won't be able to change permissions until you first change the owner for the folder and all subfolders and files as shown above.
Click OK until you have closed all properties windows and are back to the Windows Explorer screen. Then right-click on the folder or file again and choose Properties again.
Now click on the Security tab again, but instead of clicking on Advanced, you need to click the Edit button.
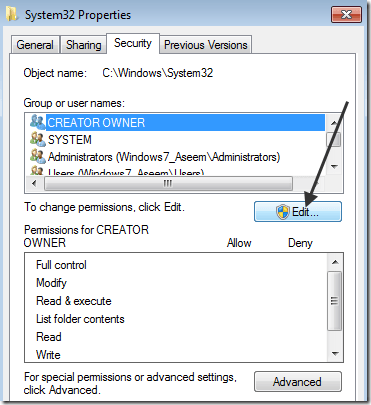
Now click on the user name in the list that you want to change the permissions for, which should be the same as who you changed the current owner too. If the user name is not in the list, click Add, type in the name and click OK.
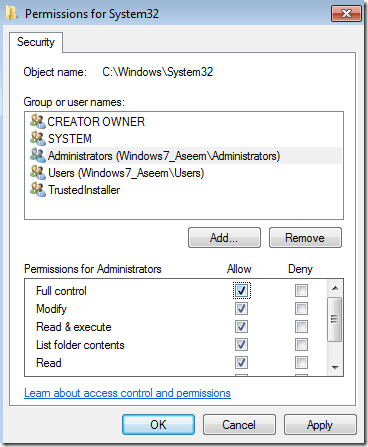
Since I had changed the current owner to Administrators, I clicked on Administrators here and then clicked on the check box next to Full Control. When you do that, all the other boxes get checked too.
Click OK once and then click OK one more time to get back to Windows Explorer. Now you can delete those files without any UAC messages telling you that you can't! It's quite a few steps, but it does work. Enjoy!
Do not share my Personal Information.
how to delete trustedinstaller windows 10
Source: https://helpdeskgeek.com/windows-7/windows-7-how-to-delete-files-protected-by-trustedinstaller/
Posted by: mclendondises1988.blogspot.com

0 Response to "how to delete trustedinstaller windows 10"
Post a Comment